 | ||
| Android Lollipop brings a lot of improvements, but if the firmware is still unofficial, God knows what bugs still live inside the software |
As you can see from my review here, some Evercoss One X units ship with a user debug version of Android Lollipop. User debug basically means that it’s still in beta stages and (probably) not ready for prime time due to bugs (camera flash and battery drain). What’s worse is that it won’t get official updates from Google, considering the firmware as ‘tampered’ and ‘unofficial’. I don’t know how a company as big as Evercoss could make such a mistake, as other Android One manufacturers don’t seem to have the same issue.
If you want to get the best of your phone, then you’ll have to upgrade it to stock Lollipop. There are actually two ways to do this: either go to the official service centre and have them upgrade your phone or do it yourself. The former consumes more time since you have to get there and queue up. Moreover, they might charge you for the service and you’ll have to wait there until the upgrade is finished. However, it’s safe and you’ll have somebody to blame in case something goes wrong, God forbid. The latter, although quite risky, saves you more time and money. Additionally, it also gives you a little bit of knowledge about tinkering with Android. Just keep in mind that the risk of bricking your phone could be a deal breaker.
With those considerations in mind, I decided to try upgrading it myself. I’m going to post a step-by-step guide I went through to finally make my Android One smartphone running stock official Android, courtesy of good people of the Internet. Head past the break to read through them.
Please bear in mind that although it’s successful for me, the act tinkering your Android device might void your warranty and accidents may happen. Proceed at your own risk. I can help you but I cannot be held responsible for whatever happens to your phone. Do it at your own risk!
Additionally, they say that this method also works on other Indonesian Android One model (Mito Impact and Nexian Journey One). However, I can’t promise anything as I can only confirm this works on Evercoss One X. Once again, do it at your own risk!
Okay, so you decided to continue. Here’s what you’re going to need:
- Android One Toolkit
- Android One Toolkit is a convenient software designed especially for tinkering your Android One devices, let it be Indian or Indonesian (it might be compatible with other countries too, but no word on that yet). You can unlock your boot loader, root your phone, and even install a new recovery image. You can download Android One Toolkit here.
- TWRP recovery image
- Since we’re going to restore a TWRP backup, we’re going to need the latest TWRP recovery that can actually read that backup file. You can download the image here.
- TWRP recovery stock ROM backup
- The objective of this guide is to restore a working TWRP stock Lollipop backup onto your phone. Yes, someone backed their phone up but don’t worry, what he backed up was only the essentials of the ROM. Once you successfully install the ROM, you’ll notice that it’s like new.
- You can download this here. You might need to register and ask to join the group to see this post. Credits to the original uploader.
Install Android One Toolkit
You’ll have to install Android One Toolkit first. Extract the zip file you downloaded and head to the setup folder and launch the .exe. Once everything’s done, update it by running the file in the update folder. After everything’s done, open Android One Toolkit. Oh, and just to be safe, run it as Administrator if you can.
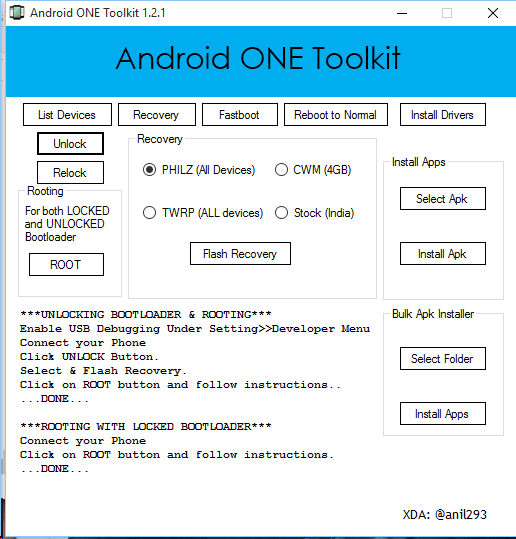 |
| Android One Toolkit window |
Prepare Your Phone
 |
| If you see this, then your phone is successfully connected. |
Unlock Your Bootloader
 |
| Your bootloader is now unlocked |
Root Your Phone
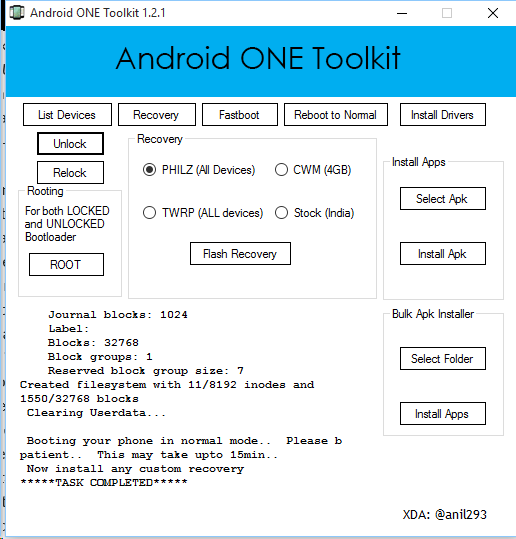
Flash Custom Recovery and Force Backup
Now, the next thing we’re going to do is to flash the recovery and force backup the phone to “draw out” the directory needed for restore. Make sure your phone is connected and select the TWRP radio button. Hit “Flash Recovery” and wait until the process is complete. After it’s done, you can hit the “Recovery” button on the top to reboot to recovery. If you make it to TWRP (like the screen below), you’re finished with this process.
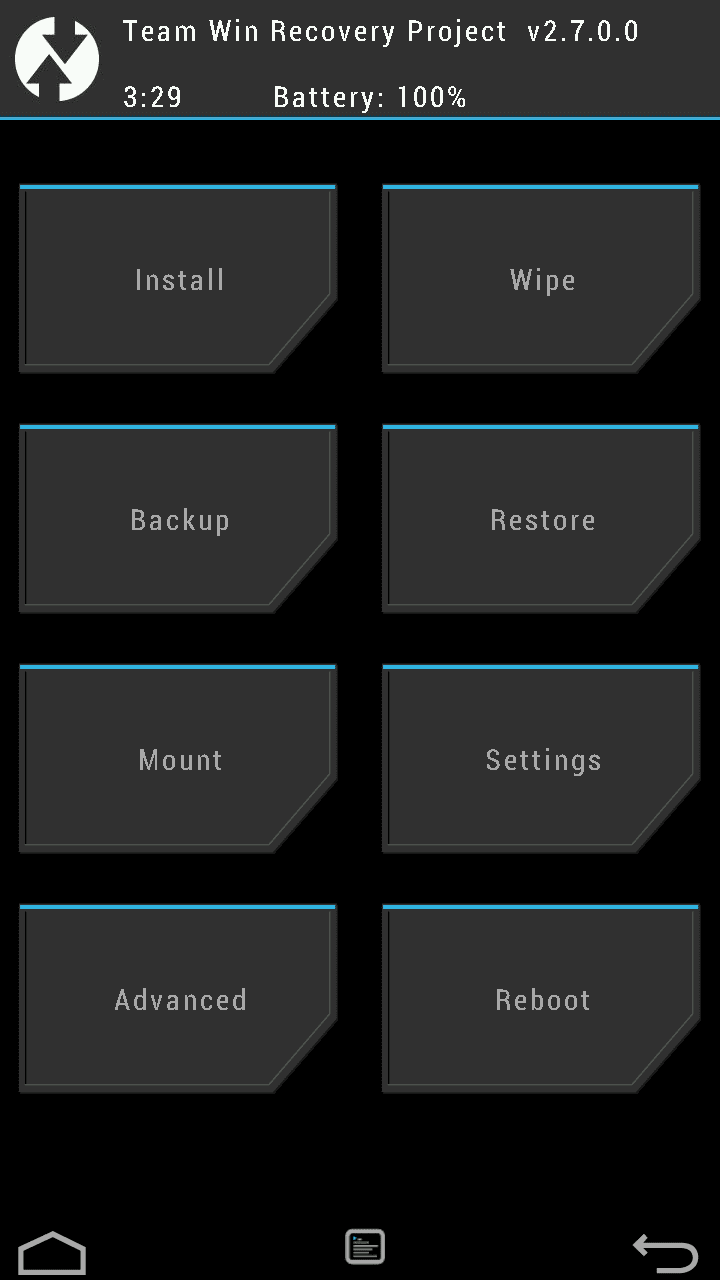 |
| TWRP Recovery will look mostly like this |
If you don’t see it, however, and have an Android logo lying down open with an exclamation mark on top of it instead, don’t panic. I also experienced it and I have a way to go around it. Open Command Prompt and run it as Administrator. After that, head out to your Android One Toolkit installation directory (using the command cd X:blablablaAndroid One Toolkit), then type the following command:
Copy The Backup File Into Your Phone
The next thing we’re going to do is to put the backup file into your phone. I recommend doing it in your internal SD card to avoid problems later. Extract the file and copy the whole folder.
Now’s the tricky part. Use your ‘root-supercharged’ file manager which you downloaded before to copy that folder and its contents into the following directory. Make sure you’ve rooted your phone and supercharged your file explorer app with root access or you won’t be able to see this folder.
DeviceID is unique per device so yours isn’t going to be the same as mine. But chances are this is the first time you backup and there’s not going to be other device IDs. Paste your copied folder here, and boot back to TWRP using the previous step.
Restore Backup
Okay, almost done now. From the TWRP menu, choose restore. Find the folder you copied from the previous step and restore it. It’s going to take a while, so take your time and relax. Once everything’s done, your phone should reboot to normal, and no data will be lost. From this moment on, start testing your phone by downloading apps, opening apps, etc. I had so many errors and force closes during this phase. If you’re on the same boat as me, do a factory reset. After doing a factory reset, the phone feels like brand new. Now it feels snappier, the annoying camera flash bug is gone, and there’s no more ‘Miscellaneous’ entry in Battery Usage. It’s all good now.
 |
| Now your phone is running stock ROM from Google. Neat! |
Okay, now we’re done. The next thing you can do is re-root your phone or re-lock the bootloader to ‘reclaim’ your warranty. As for updates, since this is stock, unmodified firmware, you should still be able to install updates via OTA. However, until today, I still haven’t got any update notification. Maybe our more experienced readers can give their opinion about this?
Okay, I guess that’s all, Folks, we’re finally reaching the end. Those are the steps I went through to ‘upgrade’ my Evercoss One X to stock ROM. If Evercoss were to be more careful and not so hasty launching their phone, this wouldn’t have happened but hey, at least we can learn something new, right? Anyway, I hope you can find this guide useful. If you have any questions, suggestions, or even critics, just have your say at the comment section below. I’ll try to get back to you as soon as I can. In the end, thanks for reading and I’m looking forward to your next visit. Have a nice and productive day, everyone!